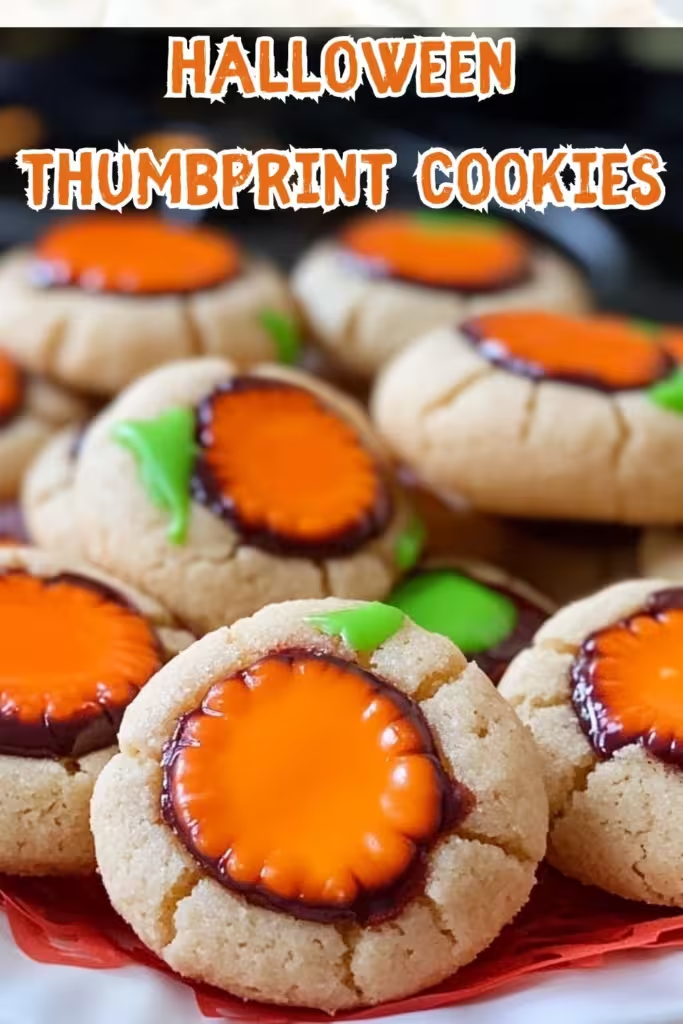
There’s something unbelievably charming about Halloween treats, don’t you think? I mean, who can resist those sweet little cookies that have a spooky spin? One of my all-time favorites is Halloween Thumbprint Cookies. Every year, as the leaves start changing and the air turns crisp, I whip up a batch of these delightful treats. They’re not just delicious; they bring back memories of my childhood when my family would bake cookies together, filling the house with laughter and the sweet smell of sugar.
These cookies are soft and chewy with a fun twist – the thumbprint filled with rich chocolate, and of course, you can’t forget about the sprinkles! They make the perfect treat for Halloween parties, school events, or just a cozy night in while you’re enjoying your favorite spooky movie. Plus, they’re a hit with kids and adults alike, ensuring that you’ll be the star of the treat table! So grab your apron and let’s get baking these fun Halloween Thumbprint Cookies!
What’s in Halloween Thumbprint Cookies?
Unsalted Butter: The star of the show! I always use unsalted butter to control the saltiness, and making sure it’s softened to room temperature is key for that light and fluffy texture.
Sugar: A classic sweetener that adds the perfect amount of sweetness. I like to use a mix of granulated and brown sugar for that soft and chewy texture.
Brown Sugar: Packed with moisture, brown sugar gives the cookies that delightful chewiness. Make sure it’s packed tightly into your measuring cup for best results!
Eggs: These contribute to the richness of the cookies and help bind all the ingredients together.
Vanilla Extract: A splash of pure vanilla extract adds warmth and enhances all the delicious flavors. Trust me, it’s a must-have!
Flour: All-purpose flour is essential here to give structure to the cookies. Spooning it into the measuring cup instead of scooping directly helps in avoiding dense cookies.
Baking Soda: This is the magic ingredient that makes the cookies puff up just right.
Salt: Just a pinch balances the sweetness and enhances the overall flavor.
Chocolate Chips or Candy Melts: This is the fun part! Whether you choose classic chocolate chips or colorful candy melts, they make the thumbprint filling a delightful surprise.
Sprinkles: Totally optional, but I think they just scream Halloween spirit and make the cookies look festive!
Is Halloween Thumbprint Cookies Good for You?
Well, let’s not kid ourselves; these cookies are definitely more on the indulgent side! But here’s the scoop:
Butter: Provides richness; hey, everything in moderation, right? It has fats that can keep you fuller longer.
Brown Sugar: Contains some minerals like calcium and potassium but is still a form of sugar, so it’s best enjoyed on special occasions.
Chocolate Chips: Depending on what kind you choose, dark chocolate can have health benefits, including antioxidants, while milk chocolate is undeniably delicious but higher in sugar.
So, sure, these cookies aren’t health food, but they can bring a lot of joy! Just keep portions in check, and they’ll fit right into your happy treats lineup.
Ingredients List
– 1 cup unsalted butter, softened
– 1 cup sugar
– 1 cup brown sugar, packed
– 2 large eggs
– 1 teaspoon vanilla extract
– 3 cups all-purpose flour
– 1 teaspoon baking soda
– 1/2 teaspoon salt
– 1 cup chocolate chips or candy melts (for filling)
– Sprinkles (optional, for decoration)
Makes about 24 cookies.
How to Make Halloween Thumbprint Cookies?
1. Preheat your oven to 350°F (175°C). An essential first step to ensure those cookies bake just right!
2. In a large bowl, cream together the softened butter, sugar, and brown sugar until light and fluffy. This can take about 2-3 minutes with a mixer—it’s worth it!
3. Add in the eggs and vanilla extract; mix until well combined.
4. In another bowl, whisk together the flour, baking soda, and salt. Gradually add these dry ingredients to the wet mixture, stirring gently until just combined.
5. Roll the dough into small balls (about 1 inch in diameter) and place them on a baking sheet lined with parchment paper. Make sure to leave some space between them!
6. Use your thumb or the back of a spoon to create a small indentation in the center of each ball. Don’t go too deep—just enough to hold that tasty filling.
7. Fill each indentation with chocolate chips or candy melts. Add as much or as little as you fancy!
8. Bake for about 10-12 minutes or until they’re lightly golden around the edges. Keep an eye on them, as oven times can vary!
9. Optional: While the cookies are still warm, add sprinkles for that extra festive flair.
10. Let the cookies cool on a wire rack before serving.
Spooky Tips for Your Cookies
– Feel free to get creative with the filling! You could use peanut butter chips, caramel, or colored frosting in place of chocolate for a different twist.
– Want to make them extra spooky? Try dyeing the dough a Halloween color by adding food coloring!
– Store any leftover cookies in an airtight container; they’ll be good for about 3-4 days, though I’m pretty sure they’ll disappear much quicker than that!
I can’t wait for you to try these Halloween Thumbprint Cookies! They’re a fantastic treat for all ages, and I promise, just one won’t be enough. If you make a batch, be sure to drop me a note about how they turned out. Happy Halloween baking, and enjoy every spooky bite! 🕷️🍪