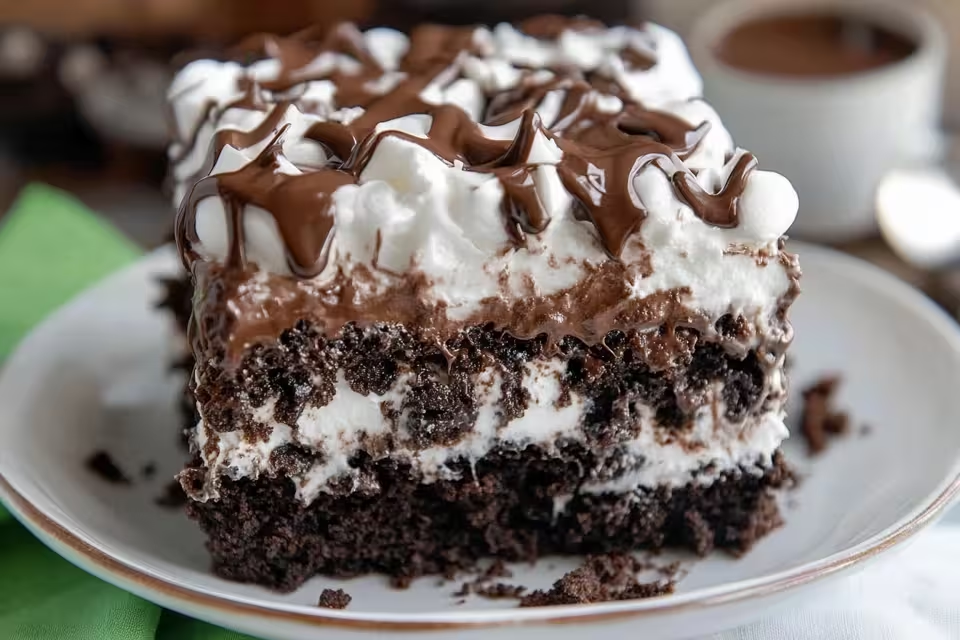
Oh, have I got a treat for you today! Let me take you on a delicious journey with my all-time favorite dessert – the **Marshmallow Chocolate Poke Cake**. This decadent chocolate cake is about to become your new go-to for gatherings, parties, or even just a little indulgent me-time.
Why do I love it so much, you ask? Well, let’s just say it’s the cake that made my childhood sweeter. If you’ve ever had that moment of bliss when dessert hits the spot perfectly, this cake will transport you back to those times! The combination of rich chocolate, gooey marshmallows, and creamy pudding is just *drool-worthy*. Plus, it’s super easy to whip up!
Now, let’s dive into the details of this cake that not only looks gorgeous but tastes amazing!
What’s in Marshmallow Chocolate Poke Cake?
Chocolate Cake Mix: This forms the base of our cake. I typically go for a classic brand like Duncan Hines or Betty Crocker; they never disappoint!
Eggs: These help bind the cake together and add moisture. Fresh organic eggs are my preference; they just taste better!
Water: Just standard tap water does the trick here. It helps combine the dry mix with the wet ingredients.
Oil: I often use vegetable oil for that extra moisture, but you could also use coconut oil for a twist of flavor.
Mini Marshmallows: The star of the show! Their fluffy sweetness will melt in your mouth, and they add a delightful texture.
Chocolate Pudding Mix: A luscious addition that amplifies the chocolate flavor. Instant pudding works beautifully!
Milk: This is mixed with the pudding to create that silky layer on top of the cake. Almond milk can also be used if you want a dairy-free version.
Whipped Topping: This light and fluffy layer brings a cool creaminess that balances out the richness of the chocolate. I usually grab a tub of Cool Whip.
Chocolate Syrup: And of course, what’s a chocolate cake without a drizzle of syrup? It brings the whole creation together!
How to Make Marshmallow Chocolate Poke Cake?
1. **Bake the Cake**: Preheat your oven according to the instructions on the chocolate cake mix package. Prepare the cake batter as directed – usually mixing the cake mix, eggs, water, and oil until smooth. Pour it into a greased 9×13 inch pan and bake as per the package instructions. Your kitchen will start to smell heavenly!
2. **Poke Holes**: Once the cake is baked and fresh out of the oven, let it cool for about 10-15 minutes. Use the end of a wooden spoon (or anything round and about the same size) to poke holes all over the top of the cake. It might feel slightly therapeutic to poke those holes – I promise!
3. **Add Pudding**: While the cake cools, grab a mixing bowl and prepare the chocolate pudding according to the package instructions by whisking it together with the milk. Pour it over the cake, ensuring it seeps into all those lovely holes you created. Talk about a flavor explosion!
4. **Add Marshmallows**: Sprinkle those mini marshmallows generously on top of the pudding layer. Feel free to be generous – we don’t need to skimp on the fun here!
5. **Top with Whipped Topping**: Now, spread that whipped topping over the marshmallows. It’s like putting a fluffy cloud on your cake!
6. **Drizzle Chocolate Syrup**: Go crazy with that chocolate syrup! Drizzle it all over the top for an extra decadent finish.
7. **Chill**: Refrigerate your masterpiece for a few hours or overnight. Trust me; the longer you let it chill, the better the flavors meld together.
Your Sweet Secrets to Success!
– **Garnishing Magic**: You can garnish the cake with chocolate shavings, sprinkles, or even crush up some cookies for an extra layer of texture.
– **Flavor Twists**: Want a peanut butter twist? Try layering some peanut butter cups on top instead of or alongside the chocolate syrup!
– **Custom Toppings**: You can switch out the whipped topping for freshly whipped cream if you feel like being fancy.
Oh, I can hardly contain my excitement for you to try this recipe! It’s such a crowd-pleaser, and I promise once you make it, it will become part of your regular dessert rotation. Don’t forget to gather your family and friends to share this ooey-gooey delight. And hey, I’d love to hear how it turns out for you! Happy baking!


